


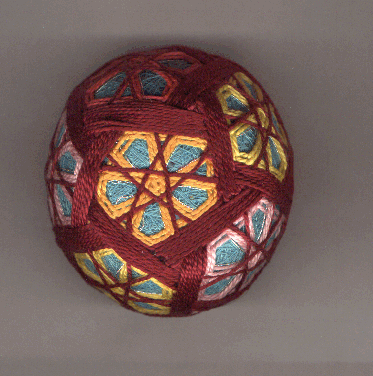
Big Star Variation 3 (Citrus)
 Please follow the link at the bottom to try the original "Big Star".
Begin with a C-10. This ball is pretty easy to do. It's done in 2 steps. If you use a single color on the first step and stop after that point -- your ball will look like a complicated web.
The reason I call this "Citrus" is because you can choose the following colors to make a citrus looking Temari.
| Fruit | Base Mari | Step 1 | Step 2 |
|---|---|---|---|
| LEMON | Light yellow | White as color A and a medium to dark yellow as color B | Same color B as before or a slightly darker yellow |
| LIME | Light green | White as color A and a medium to dark green as color B | Same color B as before or a slightly darker green |
| GRAPEFRUIT | Light pink | White as color A and a medium to dark yellow or pink as color B | Same color B as before or a slightly darker yellow or pink |
| ORANGE | Medium orange | White as color A and a medium to dark orange as color B | Same color B as before or a slightly darker orange |
As you can tell from my Temari ball -- I chose to make each "section" of the ball a different inner color. (That was partially to make things more clear, but also because I could.)
Part 1
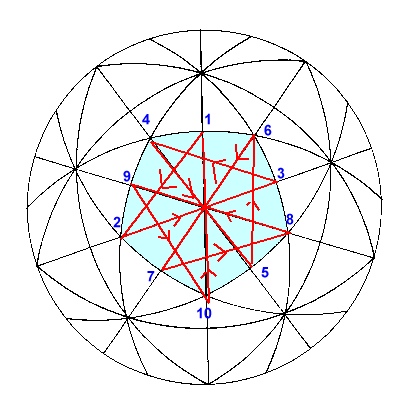
Start with a C-10. You will be centering the first design around the pentagon. Using the same type of pattern as "Big Star", you will begin (with color A) at the middle of a side of the ball. From here you cross to the corner that is not adjacent to that side, and not opposite. (In the diagram, I went to the right corner with those properties). Be sure to always head to the right whenever you leave the middle of a side. From this corner, cross the middle of the pentagon to the middle of the opposite side. Repeat until you have met your original starting point.
Do 1 round around each pentagon, then repeat. Finally use color B and do it one last time. (To make a multicolored design like I did, just do each pentagon in a different color. I used 4 colors total instead of one color "A".)
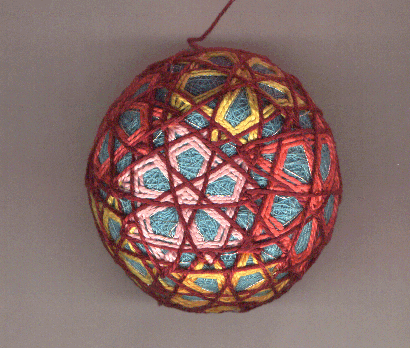
This is what your ball should look like at this point:
Part 2
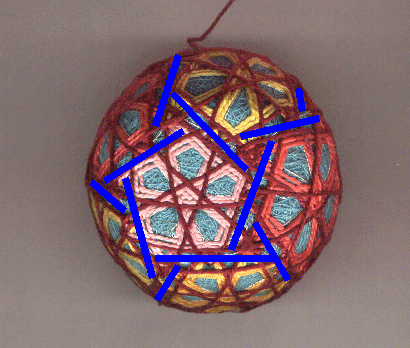
Now use color C to cover the threads along the lines shown in the picture above. You can do this in many ways. The easiest is simply a back and forth motion. You'll notice that the endpoints of any single blue line is covered by another blue line. Use this to your advantage! You can simple extend out any blue line under the other lines to tuck away your rough edges of color C. That's it. Now you are done.
This pattern was inspired by  .
.